写在开头
hexo的安装
请参考官网。
Windows下安装
若想在本机安装hexo,首先需要以下两个软件:
安装成功后,在你喜欢的位置安装hexo(通过Git bash)
1 | npm install -g hexo-cli |
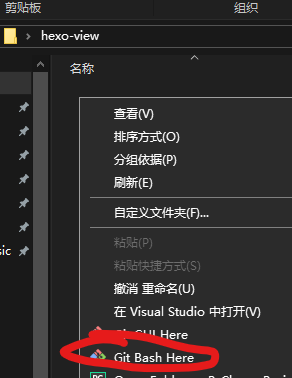
接下来,在你想安装hexo的文件夹中,点击Git Bash Here
1 | hexo init |
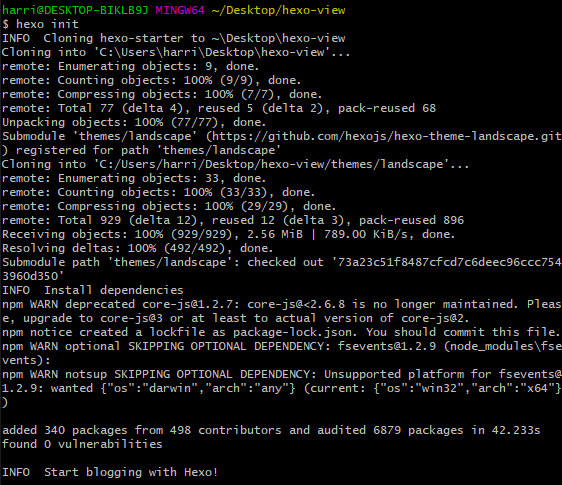
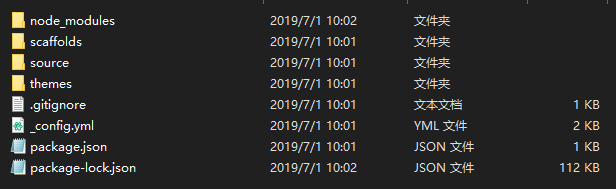
这样,基本的安装就完成了,打开hexo所在目录检查是否安装成功。
编辑站点信息
编辑站点配置文件_config.yml,即为hexo根目录下的_config.yml文件。推荐使用Atom。
在文件的开头,你将看到如下文字:
1 | # Site |
此为你的网站配置。如下表格是参数详解。
| 参数 | 描述 |
|---|---|
| title | 网站标题 |
| subtitle | 网站副标题 |
| desciption | 网站描述 |
| author | 您的名字 |
| language | 网站使用的语言 |
| timezone | 网站时区。Hexo 默认使用您电脑的时区。时区列表。比如说:America/New_York, Japan, 和 UTC 。 |
其中,description主要用于SEO,告诉搜索引擎一个关于您站点的简单描述,通常建议在其中包含您网站的关键词。author参数用于主题显示文章的作者。
例如:我将其修改为
1 | # Site |
下一段,您将看到如下文字:
1 | url: http://yoursite.com |
参数详解:
| 参数 | 描述 | 默认值 |
|---|---|---|
| url | 网址 | |
| root | 网站根目录 | |
| permalink | 文章的永久链接格式 | :year/:month/:day/:title/ |
| permalink_defaults | 永久链接中各部分的默认值 |
其中,url即是你博客的域名地址。剩下的部分暂时可以不用修改。
例如,我将其修改为:
1 | url: https://blog.skihome.xyz |
hexo主题——Next
不得不说next真的是hexo中最易用、最美观(自我认为)、支持插件最多的主题了。所以我在这里推荐使用Next作为hexo主题。
安装
请参考官网。
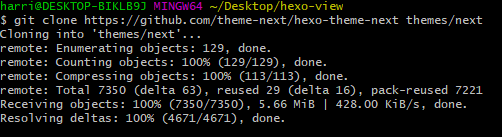
首先使用Git Bash cd到你的hexo根目录。运行如下指令:
1 | git clone https://github.com/theme-next/hexo-theme-next themes/next |
您可以通过命令更新到最新的主分支[1]。
使用NexT主题
编辑站点配置文件_config.yml,将themes改为next。
1 | theme: next |
检查是否切换
首先,使用hexo g命令生成静态文件。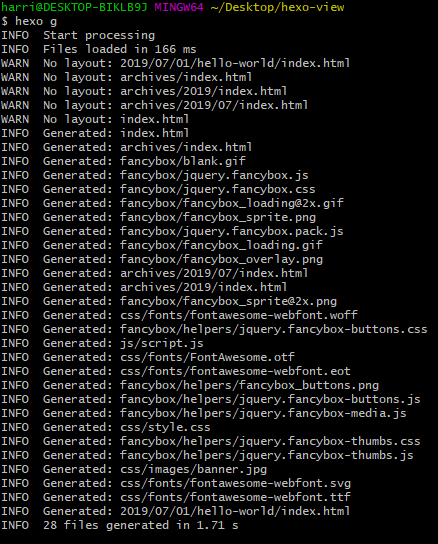
使用hexo server命令检查。
cd到你hexo的根目录,在Git Bash中输入hexo server。
若一切正常,你将看到如下图示。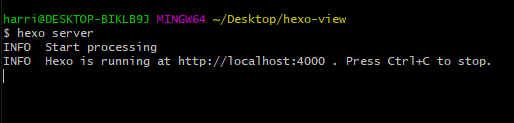
此时,你可以通过http://localhost:4000 打开你的hexo博客。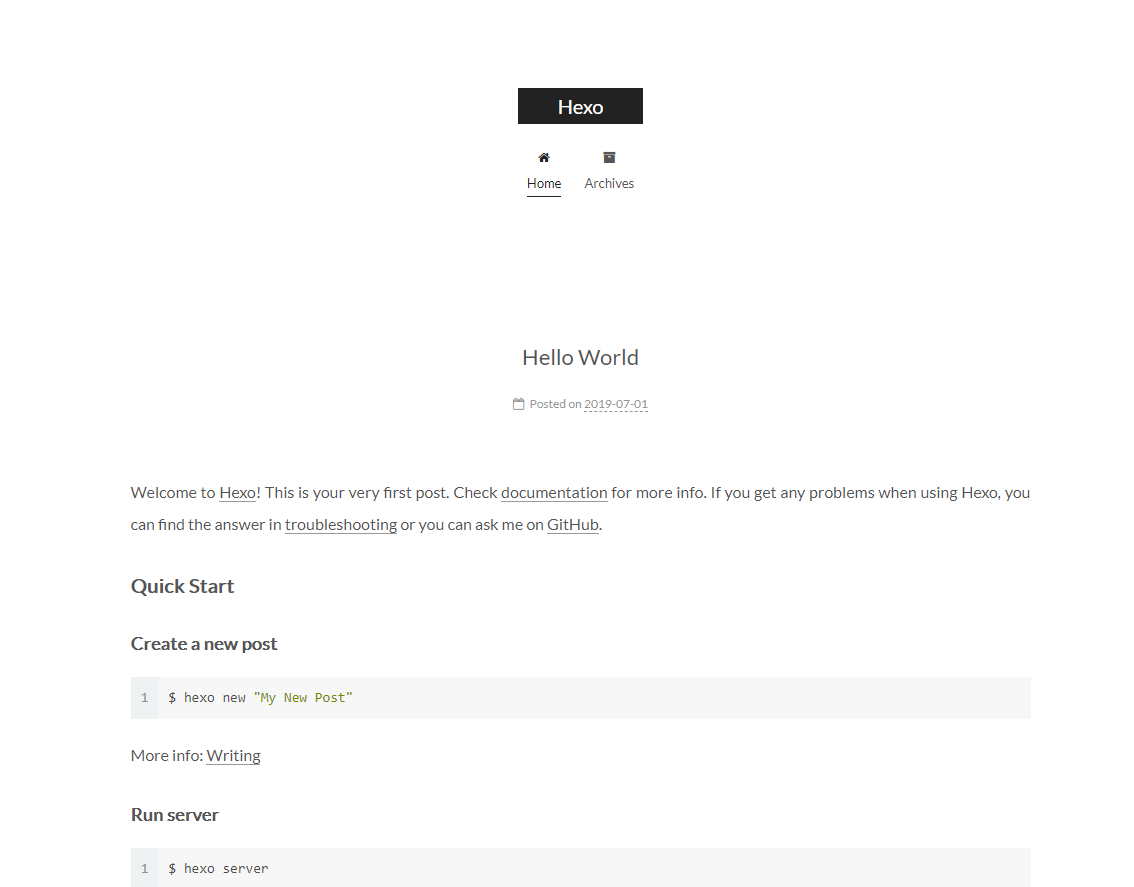
若为以上图示,则证明切换成功。在Git Bash通过Ctrl+C退出Server模式。
修改Next配置文件
编辑主题配置文件_config.yml,即为hexo\themes\next的_config.yml文件。
搜索scheme字样,直到看到如下字段:
1 | # Schemes |
作者头像添加
编辑主题配置文件_config.yml,搜索avatar,直到看到如下字段:
1 | avatar: |
其中url是你的头像位置,rounded是是否为原型显示,opacity不透明度,rotated将使用光标旋转头像。你可以按照自己喜好修改。
在hexo\themes\next\source位置新建uploads文件夹,用于存放你的头像等个人信息文件。将你的头像保存在此文件夹中。
这里假设你的头像文件为avatar.jpg,那么,你将按照如下修改主题配置文件。
1 | avatar: |
网站图标
网站图标为png格式文件,并不是ico格式文件。
在hexo\themes\next\source\images文件夹下修改对应文件。例如:
- favicon-16x16-next.png
- favicon-32x32-next.png
- apple-touch-icon-next.png
Sidebar的超级优化
添加标签、分类等页面
编辑主题配置文件_config.yml,搜索menu,直到看到如下字段: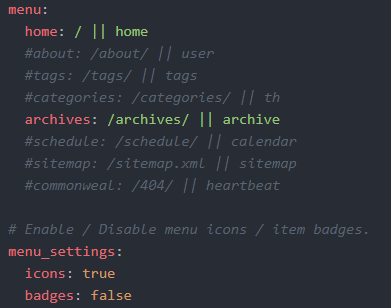
添加关于、标签、分类页面,将对应的#号去除即可。
例如,我将其修改为:
1 | menu: |
最前面的home、about是页面显示的文字,双竖线后面的则是图标[2]标签。
你可以添加中文、以及非博客页面。例如:
1 | menu: |
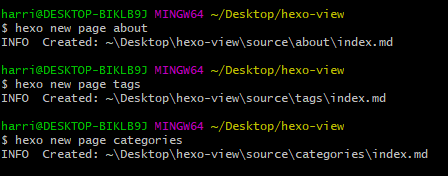
返回hexo根目录,使用Git Bash输入如下指令新建三个页面:
1 | hexo new page about |
打开对应文件,例如,打开about页面文件,则为hexo\source\about\index.md。
在这里可输入你的关于信息。若想禁用评论,请在开头加入comments: false。例如:
1 | title: 关于 |
举例: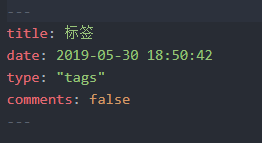
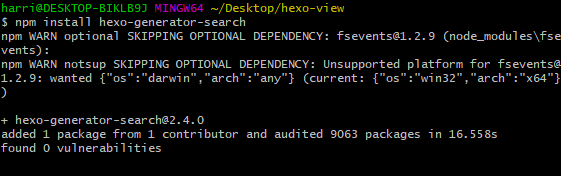
添加localsearch页面搜索
在hexo根目录下使用Git Bash安装hexo-generator-search。
1 | npm install hexo-generator-search |
编辑主题配置文件_config.yml,搜索local_search,将enable改为true。
1 | local_search: |
编辑站点配置文件配置文件_config.yml,添加如下字段:
1 | search: |
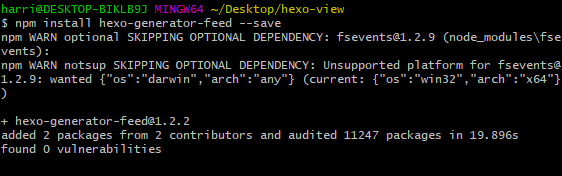
添加RSS
在hexo根目录下使用Git Bash安装hexo-generator-feed。
1 | npm install hexo-generator-feed --save |
添加社交链接、友情链接
添加社交链接
编辑主题配置文件_config.yml,搜索social,将你想添加的社交链接前的#号去除,然后加入你的社交链接。例如:
1 | social: |
下一段字段为social_icons:
1 | social_icons: |
其中,icons_only如果设置为true,则只显示社交图标。
添加友情链接
编辑主题配置文件_config.yml,在social_icons的下两段即为社交链接(links)。
你想添加的社交名称在冒号左边,链接在冒号右边。例如:
1 | links: |
添加可爱的看板娘(加对话框)
修改back2top按钮样式
默认的返回页首按钮在右边,为了美观我们可以把它改到Sidebar上,但这样会导致很多浏览者找不到按钮,这样我们可以通过简单的修改back2top按钮的颜色来达到强调效果。
打开hexo\themes\next\source\css\_custom\custom.styl,在文件末尾添加:
1 | //back2top颜色修改 |
这样,back2top的按钮就变成了蓝色。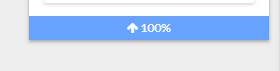
添加一个Aplayer播放器
Demo: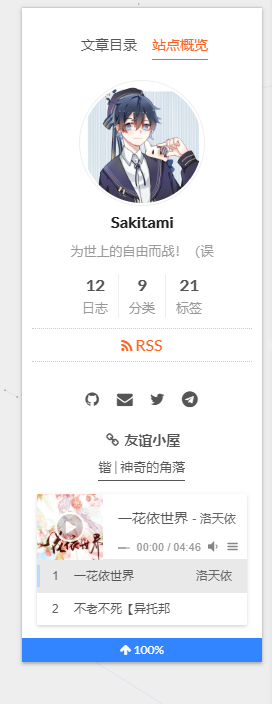
安装
Github下载源码,解压后将dist文件夹复制到hexo\themes\next\source中。
创建播放列表
在dist文件夹中新建music.js文件,并添加以下内容。
1 | const ap = new APlayer({ |
更多参数
请参照Aplayer 中文文档
加载播放器
打开hexo\themes\next\layout\_custom\sidebar.swig文件,并加入如下内容:
1 | <link rel="stylesheet" href="/dist/APlayer.min.css"> |
各种插件,完善浏览体验
使用Hexo提供的各种插件,完善使用&浏览体验。
添加文章加密
在hexo根目录下使用Git Bash安装hexo-blog-encrypt。
1 | npm install --save hexo-blog-encrypt |
编辑站点配置文件_config.yml,在末尾添加如下字段:
1 | encrypt: |
在文章头部添加相应字段:
1 | password: passwd |
更多内容
请移步Brayn简书
添加Valine评论系统
Valine官网
NexT主题集成Valine评论系统,因此我们只需要注册Leancloud[3]并作出相应配置即可。
LeanCloud配置
注册一个LeanCloud账号,进入控制台并创建一个应用。
进入刚创建的应用,选择左下角的设置>应用Key,获取APP ID和APP Key。
基本配置
编辑主题配置文件_config.yml,搜索social,直到看到以下字段:
1 | valine: |
将我们刚才得到的APP ID 和 APP Key分别填入appid和appkey后,enable改为true。
另:visitor如果为true,则会在文章开头加入浏览次数和评论数。
默认头像修改
avatar字段为默认头像,可选类型有:
| 参数值 | 表现形式 | 备注 |
|---|---|---|
| 空字符串’’ |  | Gravatar官方图形 |
| mp |  | 神秘人(一个灰白头像) |
| identicon |  | 抽象几何图形 |
| monsterid |  | 小怪物 |
| wavatar |  | 用不同面孔和背景组合生成的头像 |
| retro |  | 八位像素复古头像 |
| robohash |  | 一种具有不同颜色、面部等的机器人 |
| hide | 不显示头像 |
邮件提醒
本段照搬Valine文档。
Valine 评论系统中的邮件提醒设置
进入Leancloud>选择你的评论所存放的应用>设置>邮件模板,按下图设置好用于重置密码的邮件主题>保存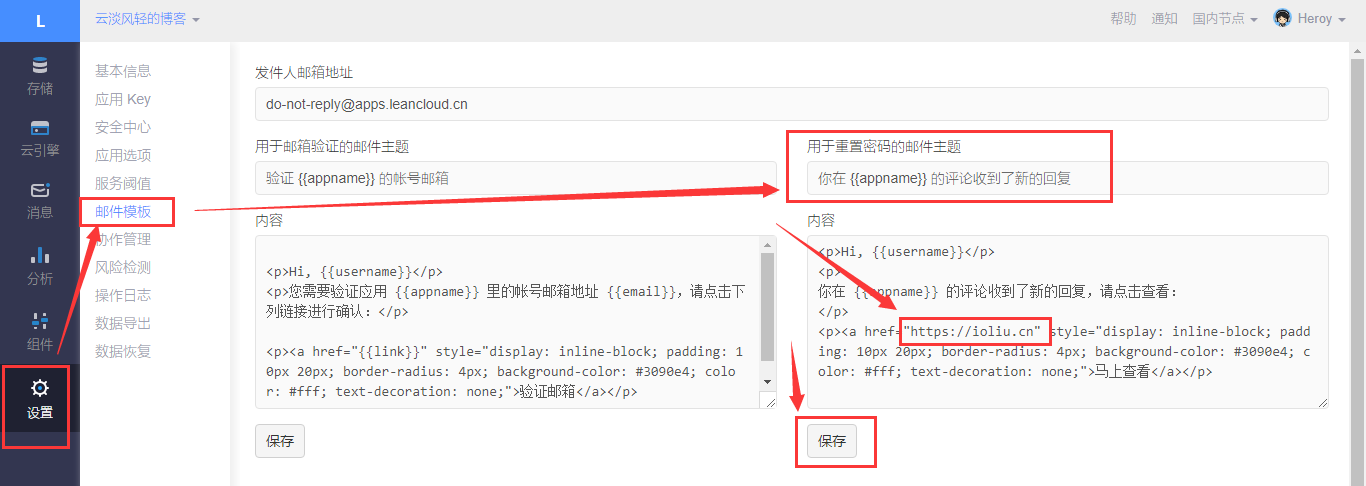
注:请注意修改链接为你的博客或者网站首页。
1 | <p>Hi, {{username}}</p> |
然后将主题配置文件中valine>notify和verify都设置为true。
更多注意事项请参阅Valine官方文档。
添加版权声明
编辑主题配置文件_config.yml,搜索creative_commons,直到看到以下字段:
1 | creative_commons: |
将post改为true即可。若想在侧栏添加标识,请修改sidebar为true。
Demo:
本文作者: Sakitami
本文链接: https://blog.skihome.xyz/posts/18f169a8/
版权声明: 本博客所有文章除特别声明外,均采用 BY-NC-SA 许可协议。转载请注明出处!
可用的6中许可证类型:
| 许可证 | 表现 | 解释 |
|---|---|---|
| by | 您(用户)可以复制、发行、展览、表演、放映、广播或通过信息网络传播本作品;您必须按照作者或者许可人指定的方式对作品进行署名。 |  |
| by-sa | 此许可证允许其他人重新组合、调整和构建您的作品,即使出于商业目的,只要他们信任您,并在相同的条款下许可他们的新作品。此许可证通常与”copyleft”自由和开源软件许可证进行比较。所有基于您的新作品将携带相同的许可证,因此任何衍生工具也将允许商业使用。这是维基百科使用的许可证,推荐用于从维基百科内容和类似许可项目中获得好处的材料。 |  |
| by-nd | 此许可证允许其他人出于任何目的(包括商业用途)重用该作品;但是,它不能以合适的形式与他人共享,并且必须为您提供信贷。 |  |
| by-nc | 此许可证允许其他人以非商业方式重新组合、调整和构建您的作品,尽管他们的新作品也必须承认您并且是非商业性的,但他们不必以相同的条款许可其衍生作品。 | |
| by-nc-sa | 此许可证允许其他人以非商业方式重新组合、调整和构建您的工作,只要他们信任您,并在相同的条款下许可他们的新作品。 |  |
| by-nc-nd | 此许可证是六个主要许可证中最严格的许可证,只允许其他人下载您的作品并与他人共享,只要他们信任您,但他们不能以任何方式更改它们或将其用于商业用途。 |  |
添加tidio实时聊天功能
Next主题默认集成tidio,请根据如下配置添加该功能。
首先,在tidio官网[4]注册账号,并获取Public Key。
编辑主题配置文件_config.yml,搜索tidio,直到看到以下字段:
1 | tidio: |
将Key改成你的public key即可。
你可以在Tidio官网设置样式。
添加Aplayer漂亮的音乐播放器
在hexo根目录下使用Git Bash安装hexo-tag-aplayer。
1 | npm install --save hexo-tag-aplayer |
编辑站点配置文件_config.yml,在末尾添加如下字段:
1 | aplayer: |
用法
1 | {% aplayer title author url [picture_url, narrow, autoplay, width:xxx, lrc:xxx] %} |
或
1 | {% meting "60198" "netease" "playlist" %} |
其中,meting和aplayer的有关参数见官方文档。
Demo:
添加动态背景canvas-nest
用Git Bash cd到你的主题目录,即为hexo\themes\next
将模块安装到目录source/lib
1 | git clone https://github.com/theme-next/theme-next-canvas-nest source/lib/canvas-nest |
编辑主题配置文件_config.yml,搜索canvas_nest,直到看到以下字段:
1 | tidio: |
将enable改成true即可。
添加脚注hexo-reference
在hexo根目录下使用Git Bash安装hexo-reference。
1 | npm install --save hexo-reference |
关于Demo请参阅官方文档
添加needmoreshare国内分享
用Git Bash cd到你的主题目录,即为hexo\themes\next
将模块安装到目录source/lib
1 | git clone https://github.com/theme-next/theme-next-needmoreshare2 source/lib/needsharebutton |
1 | needmoreshare2: |
将此三处改成true即可。
1 | needmoreshare2: |
添加likelyshare分享
编辑主题配置文件_config.yml,搜索likely,直到看到以下字段:
1 | likely: |
将enable改成true即可。其中,look的参数有:
| 参数值 | 表现形式 | 注释 |
|---|---|---|
| normal |  | 默认表现形式。 |
| light |  | NexT背景不能很好的显示,需要手动修改背景。 |
| small |  | 比默认形式稍小 |
| big |  | 比默认形式稍大 |
添加mathjax数学公式渲染
编辑主题配置文件_config.yml,搜索math,直到看到以下字段:
1 | math: |
将engine填入mathjax。
用Git Bash cd到你hexo根目录,卸载原有渲染器,并安装新的渲染器hexo-renderer-marked
1 | npm un hexo-renderer-marked --save |
Demo:

添加pangu排版
為什麼你們就是不能加個空格呢?
用Git Bash cd到你的主题目录,即为hexo\themes\next
将模块安装到目录source/lib
1 | git clone https://github.com/theme-next/theme-next-pangu.git source/lib/pangu |
编辑主题配置文件_config.yml,搜索pangu,并修改以下字段:
1 | pangu: true |
NexT页面美化
修改底部全站字数统计
在/themes/next/layout/_partials/footer.swig文件

前加上如下代码可以实现在站点底部统计全站字数:
1 | <div class="theme-info"> |
隐藏底部Hexo、Next字样
编辑主题配置文件_config.yml,搜索math,直到看到以下字段:
1 | powered: |
将两个enable同时改为true即可。
添加底部自定义的话
编辑/themes/next/layout/_partials/footer.swig文件,在底部添加此段文字。
1 | <div class="theme-info"> |
修改底部user图标
编辑主题配置文件_config.yml,搜索icon,直到看到以下字段:
1 | # Icon between year and copyright info. |
修改name为你想要的图标[2]。若想开启动态效果,请将animated设置为true。color为图标颜色。
添加打赏按钮
编辑主题配置文件_config.yml,搜索icon,直到看到以下字段:
1 | reward_settings: |
添加你的支付宝&微信收款二维码到hexo/themes/next/source/uploads中,修改为以下样式:
1 | reward_settings: |
其中,comment可以自定义文字。
添加自定义颜色块标签
在 hexo/themes/next/source/css/_custom/custom.styl中添加下列代码:
1 | // 颜色块-黄 |
添加代码块复制按钮
编辑主题配置文件_config.yml,搜索icon
1 | codeblock: |
将enable改成true即可。
添加图片放大显示
用Git Bash cd到你的主题目录,即为hexo\themes\next
将模块安装到目录source/lib
1 | git clone https://github.com/theme-next/theme-next-fancybox3 source/lib/fancybox |
编辑主题配置文件_config.yml,搜索fancybox
1 | fancybox: true |
改成true即可。
添加Dplayer播放器
在hexo根目录下使用Git Bash安装hexo-blog-encrypt。
1 | npm install hexo-tag-aplayer --save |
用法:
1 | {% dplayer key=value ... %} |
更多内容
请参考GitHub:Dplayer
添加标题崩溃欺骗
Demo:


在hexo\themes\next\js\src下创建crash_cheat.js,添加如下代码:
1 | <!--崩溃欺骗--> |
在hexo\themes\next\layout\_layout.swig文件末尾添加如下代码:
1 | <!--崩溃欺骗--> |